Camunda Helm charts
Camunda provides continuously improved Helm charts that are available here: Camunda Platform Helm Charts. Those Helm charts are not cloud provider-specific, so you can choose your Kubernetes provider.
We encourage reporting issues if you find them.
What is Helm?
Helm is a package manager for Kubernetes resources. Helm allows us to install a set of components by simply referencing a package name, and allowing us to override configurations to accommodate these packages to different scenarios.
Helm also provides dependency management between charts, meaning that charts can depend on other charts. This allows us to aggregate a set of components together that can be installed with a single command.
Components installed by the Helm charts
By default, the following will be installed:
- Camunda Platform 8 self-managed Helm (ccsm-helm):
- Zeebe: Deploys a Zeebe Cluster with three brokers using the
camunda/zeebedocker image. - Zeebe Gateway: Deploys the standalone Zeebe Gateway with two replicas.
- Operate: Deploys Operate, which connects to an existing Elasticsearch.
- Tasklist: Deploys the Tasklist component to work with user tasks.
- Optimize: Deploys the Optimize component to analyze the historic process executions.
- Identity: Deploys the Identity component responsible for authentication and authorization.
- Elasticsearch: Deploys an Elasticsearch cluster with two nodes.
- Zeebe: Deploys a Zeebe Cluster with three brokers using the
Connectors are not supported by the version 8.0 Helm charts. If you require Connectors, consider upgrading.
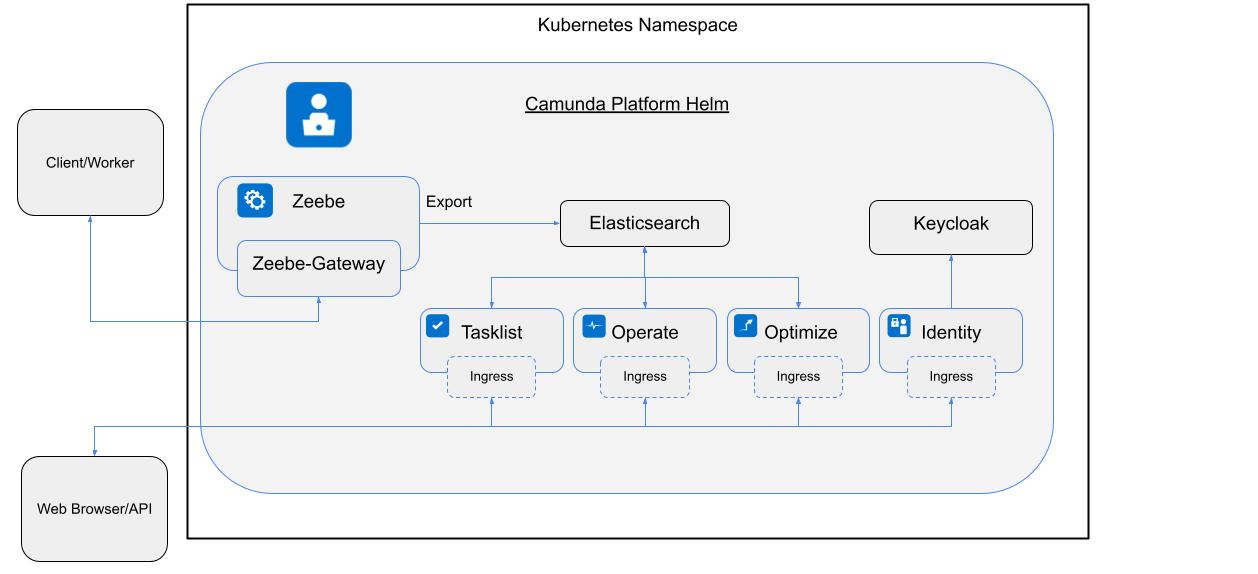
When installing the camunda-platform Helm chart, all the components in this picture are installed.
How to install Camunda 8 using Helm
Add Camunda Helm repository
You have to add the Camunda Helm chart repository in order to use the charts. Once this is done, Helm is able to fetch and install charts hosted in http://helm.camunda.io:
> helm repo add camunda https://helm.camunda.io
> helm repo update
Once this is complete, we are ready to install the Helm chart hosted in the official Camunda Helm chart repo.
Installing the Camunda Helm chart in a Cloud environment
To install the available Camunda Platform 8 components inside a Kubernetes cluster, you can simply run:
> helm install <RELEASE NAME> camunda/camunda-platform
Change >RELEASE NAME< with a name of your choice.
Also, notice that you can add the -n flag to specify in which Kubernetes namespace the components should be installed.
Notice that this Kubernetes cluster can have services which are already running; Camunda components are simply installed as another set of services.
Installing all the components in a cluster requires all Docker images to be downloaded to the remote cluster. Depending on which Cloud provider you are using, the amount of time it will take to fetch all the images will vary.
Review the progress of your deployment by checking if the Kubernetes PODs are up and running with the following:
> kubectl get pods
This will return something similar to the following:
NAME                                           READY   STATUS              RESTARTS   AGE
<RELEASE NAME>-keycloak-0                       0/1     Pending             0          4s
<RELEASE NAME>-identity-6bb5d864cc-kk6dv        0/1     ContainerCreating   0          4s
<RELEASE NAME>-operate-cb597fd76-6vr2x          0/1     ContainerCreating   0          4s
<RELEASE NAME>-optimize-676955b547-vxts7        0/1     ContainerCreating   0          4s
<RELEASE NAME>-postgresql-0                     0/1     Pending             0          4s
<RELEASE NAME>-tasklist-5bf5c56f7b-sdwg7        0/1     ContainerCreating   0          4s
<RELEASE NAME>-zeebe-0                          0/1     Pending             0          4s
<RELEASE NAME>-zeebe-1                          0/1     ContainerCreating   0          4s
<RELEASE NAME>-zeebe-2                          0/1     Pending             0          4s
<RELEASE NAME>-zeebe-gateway-657b774f95-bbcx5   0/1     ContainerCreating   0          4s
<RELEASE NAME>-zeebe-gateway-657b774f95-gmlbm   0/1     Running             0          4s
elasticsearch-master-0                          0/1     Pending             0          4s
elasticsearch-master-1                          0/1     Init:0/1            0          4s
Installing on OpenShift
To install the Camunda Platform Helm chart in OpenShift, you will need to customize the values based on your desired security context constraints (SCC). By using the anyuid SCC, you can deploy the Helm chart as described above, as with any Kubernetes cluster. For example:
> helm install <RELEASE NAME> camunda/camunda-platform
If you wish to deploy with less permissive SCC, such as restricted or nonroot, read the OpenShift deployment guide, which includes detailed instructions as well as a guide for troubleshooting common problems.
Installing the Camunda Helm chart locally using KIND
If you want to use Kubernetes KIND, add -f camunda-platform-core-kind-values.yaml. The file can be downloaded here.
Be aware, that using KIND is only recommended for development purposes.
helm install <RELEASE NAME> camunda-cloud/camunda-platform -f camunda-platform-core-kind-values.yaml
This will deploy the same components, but with a set of parameters tailored to a local environment setup.
All Docker images will be downloaded to your local KIND cluster, so it might take some time for the services to get started.
Review the progress of your deployment by checking if the Kubernetes PODs are up and running with the following:
> kubectl get pods
This will return something similar to the following:
NAME                                                   READY   STATUS    RESTARTS   AGE
elasticsearch-master-0                                 1/1     Running   0          4m6s
<RELEASE NAME>-operate-XXX                           1/1     Running   0          4m6s
<RELEASE NAME>-zeebe-0                                 1/1     Running   0          4m6s
<RELEASE NAME>-tasklist-XXX                          1/1     Running   0          4m6s
<RELEASE NAME>-zeebe-gateway                           1/1     Running   0          4m6s
Troubleshooting the installation
Check that each pod has at least 1/1 running instances. If one or more of your pods stay pending, it means that it can not be scheduled onto a node. Usually this happens because there are insufficient resources that prevent it. Use the kubectl describe ... command to check on messages from the scheduler:
> kubectl describe pods ${POD_NAME}
If the output of the describe command was not beneficial, tail the logs of these pods by running the following:
> kubectl logs -f <POD NAME>
Upgrading from one Helm release to another
To upgrade to a more recent version of the Camunda Platform Helm charts, there are certain things you need to keep in mind.
Normally for a Helm upgrade, you run the
Helm upgrade command. If you have disabled Identity and the related authentication mechanism, you should be able to easily do an upgrade via this command, helm upgrade.
However, if Identity is enabled (this is the default), the upgrade path is a bit more complex than just running helm upgrade.
Read the next sections to familiarize yourself with the upgrade process.
Upgrading with Identity and secrets
If you have installed the Camunda Platform 8 Helm charts before with default values, this means Identity and the related authentication mechanism are enabled. For authentication, the Helm charts generate for each web app the secrets randomly if not specified on installation. If you just run helm upgrade to upgrade to a newer chart version, you likely will see the following return:
$ helm upgrade camunda-platform-test camunda/camunda-platform
Error: UPGRADE FAILED: execution error at (camunda-platform/charts/identity/templates/tasklist-secret.yaml:10:22):
PASSWORDS ERROR: You must provide your current passwords when upgrading the release.
                 Note that even after reinstallation, old credentials may be needed as they may be kept in persistent volume claims.
                 Further information can be obtained at https://docs.bitnami.com/general/how-to/troubleshoot-helm-chart-issues/#credential-errors-while-upgrading-chart-releases

    'global.identity.auth.tasklist.existingSecret' must not be empty, please add '--set global.identity.auth.tasklist.existingSecret=$TASKLIST_SECRET' to the command. To get the current value:

        export TASKLIST_SECRET=$(kubectl get secret --namespace "zell-c8-optimize" "camunda-platform-test-tasklist-identity-secret" -o jsonpath="{.data.tasklist-secret}" | base64 --decode)
As mentioned, this output returns because secrets are randomly generated with the first Helm installation by default if not further specified. We use a library chart provided by Bitnami for this. The generated secrets are persisted on persistent volume claims (PVCs), which are not maintained by Helm.
If you remove the Helm chart release or do an upgrade, PVCs are not removed nor recreated. On an upgrade, secrets can be recreated by Helm, and could lead to the regeneration of the secret values. This would mean that newly-generated secrets wouldn't longer match with the persisted secrets. To avoid such an issue, Bitnami blocks the upgrade path and prints the help message as shown above.
In the error message, Bitnami links to their well-described troubleshooting guide. However, to avoid confusion we will step through the troubleshooting process in this guide as well.
Secrets extraction
For a successful upgrade, you first need to extract all secrets which were previously generated.
You also need to extract all secrets which were generated for Keycloak, since Keycloak is a dependency of Identity.
To extract the secrets, use the following code snippet. Make sure to replace <releasename> with your chosen Helm release name.
export TASKLIST_SECRET=$(kubectl get secret "<releasename>-tasklist-identity-secret" -o jsonpath="{.data.tasklist-secret}" | base64 --decode)
export OPTIMIZE_SECRET=$(kubectl get secret "<releasename>-optimize-identity-secret" -o jsonpath="{.data.optimize-secret}" | base64 --decode)
export OPERATE_SECRET=$(kubectl get secret "<releasename>-operate-identity-secret" -o jsonpath="{.data.operate-secret}" | base64 --decode)
export KEYCLOAK_ADMIN_SECRET=$(kubectl get secret "<releasename>-keycloak" -o jsonpath="{.data.admin-password}" | base64 --decode)
export KEYCLOAK_MANAGEMENT_SECRET=$(kubectl get secret "<releasename>-keycloak" -o jsonpath="{.data.management-password}" | base64 --decode)
export POSTGRESQL_SECRET=$(kubectl get secret "<releasename>-postgresql" -o jsonpath="{.data.postgres-password}" | base64 --decode)
After exporting all secrets into environment variables, run the following upgrade command.
helm upgrade <releasename> camunda/camunda-platform \
  --set global.identity.auth.tasklist.existingSecret=$TASKLIST_SECRET \
  --set global.identity.auth.optimize.existingSecret=$OPTIMIZE_SECRET \
  --set global.identity.auth.operate.existingSecret=$OPERATE_SECRET \
  --set identity.keycloak.auth.adminPassword=$KEYCLOAK_ADMIN_SECRET \
  --set identity.keycloak.auth.managementPassword=$KEYCLOAK_MANAGEMENT_SECRET \
  --set identity.keycloak.postgresql.auth.password=$POSTGRESQL_SECRET
If you have specified on the first installation certain values, you have to specify them again on the upgrade. Either via --set or the values file and the -f flag.
For more details on the Keycloak upgrade path, you can also read the Bitnami Keycloak upgrade guide.