Create and complete workflow instances
We're going to create 2 workflow instances for this tutorial: one with an order value less than $100 and one with an order value greater than or equal to $100 so that we can see our XOR gateway in action.
Go back to the Terminal window where you deployed the workflow model and execute the following command.
Note: Windows users who want to execute this command using cmd or Powershell have to escape the variables differently.
- cmd:
"{\"orderId\": 1234}"- Powershell:
'{"\"orderId"\": 1234}'
Linux
./bin/zbctl --insecure create instance order-process --variables '{"orderId": "1234", "orderValue":99}'
Mac
./bin/zbctl.darwin --insecure create instance order-process --variables '{"orderId": "1234", "orderValue":99}'
Windows (Powershell)
./bin/zbctl.exe --insecure create instance order-process --variables '{\"orderId\": \"1234\", \
"orderValue\":99}'
You'll see a response like:
{
  "workflowKey": 1,
  "bpmnProcessId": "order-process",
  "version": 1,
  "workflowInstanceKey": 8
}
This first workflow instance we just created represents a single customer order with orderId 1234 and orderValue 99 (or, $99).
In the same Terminal window, run the command:
Linux
./bin/zbctl --insecure create instance order-process --variables '{"orderId": "2345", "orderValue":100}'
Mac
./bin/zbctl.darwin --insecure create instance order-process --variables '{"orderId": "2345", "orderValue":100}'
Windows (Powershell)
./bin/zbctl.exe --insecure create instance order-process --variables '{\"orderId\": \"2345\", \
"orderValue\":100}'
This second workflow instance we just created represents a single customer order with orderId 2345 and orderValue 100 (or, $100).
If you go back to the Operate UI and refresh the page, you should now see two workflow instances (the green badge) waiting at the Initiate Payment task.
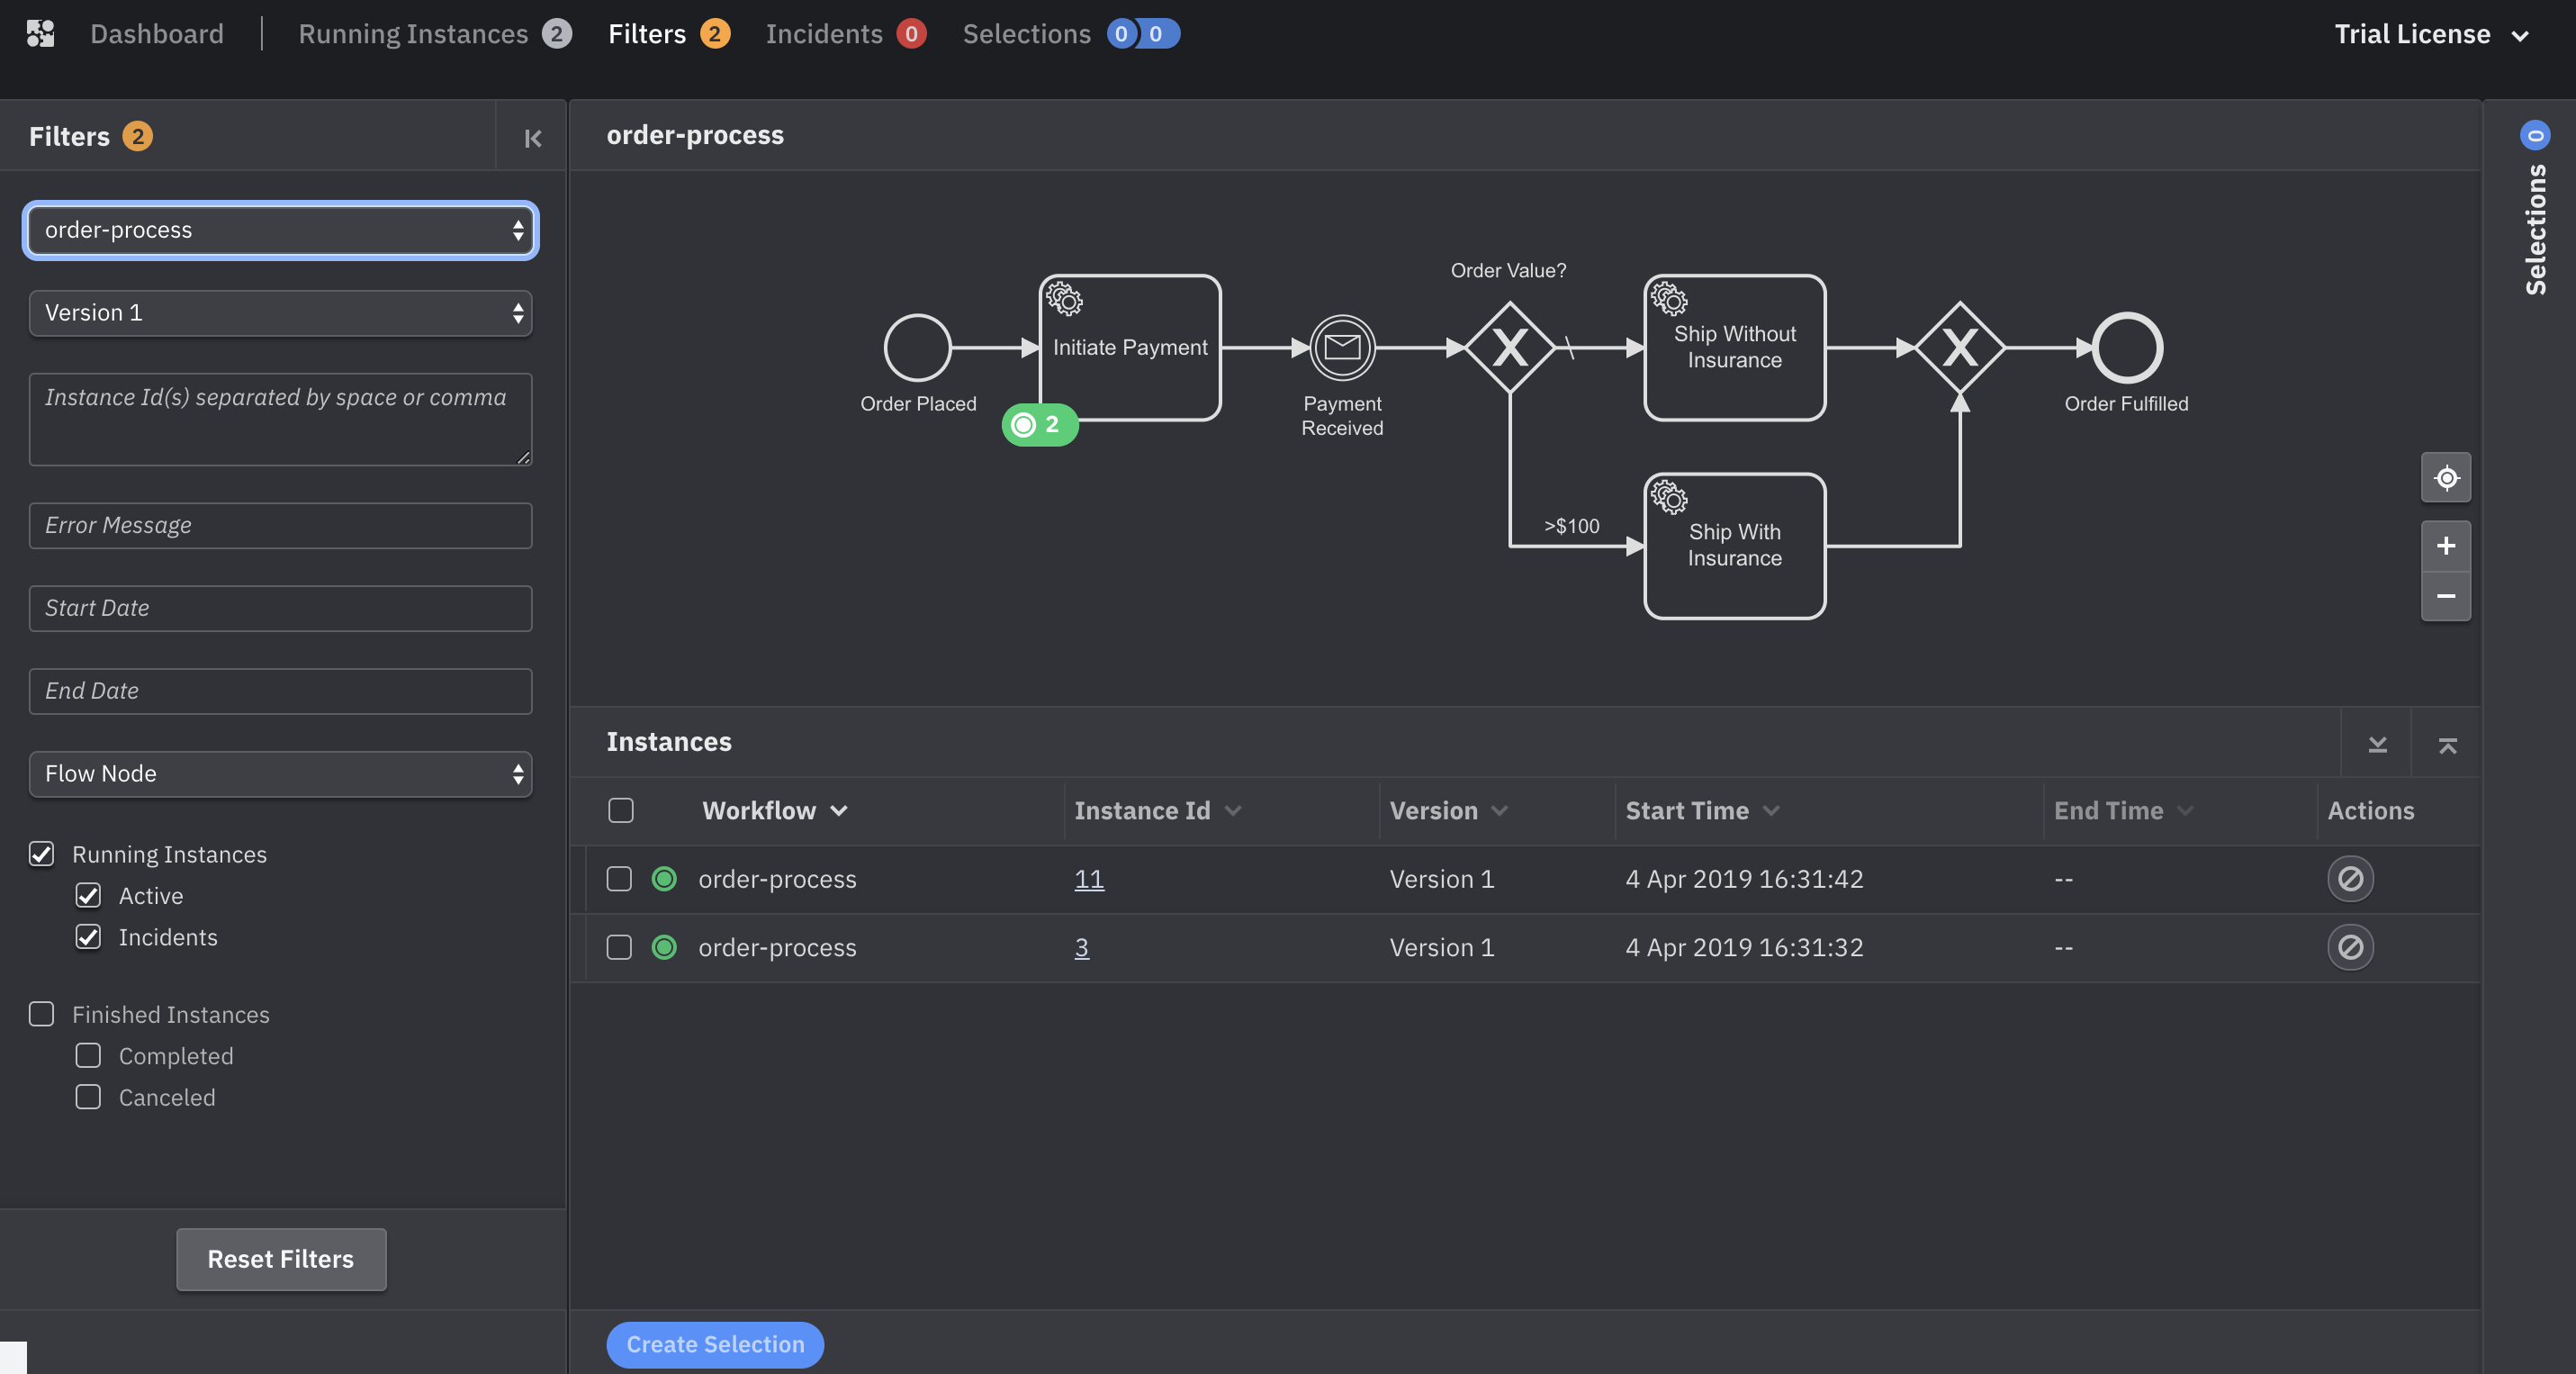
Note that the workflow instance can't move past this first task until we create a job worker to complete initiate-payment jobs. So that's exactly what we'll do next.
To make this point again: in a real-word use case, you probably won't manually create workflow instances using the Zeebe CLI. Rather, a workflow instance would be created programmatically in response to some business event, such as a message sent to Zeebe after a customer places an order. And instances might be created at very large scale if, for example, many customers were placing orders at the same time due to a sale. We're using the CLI here just for simplicity's sake.
We have two instances currently waiting at our Initiate Payment task, which means that Zeebe has created two jobs with type initiate-payment.
zbctl provides a command to spawn simple job workers using an external command or script. The job worker will receive the payload for every job as a JSON object on stdin and must also return its result as JSON object on stdout if it handled the job successfully.
In this example, we'll also use the unix command cat which just outputs what it receives on stdin.
Open a new Terminal tab or window, change into the Zeebe broker directory, and use the following command to create a job worker that will work on the initiate-payment job.
Note: For Windows users, this command does not work with cmd as the
catcommand does not exist. We recommend to use Powershell or a bash-like shell to execute this command.
Linux
./bin/zbctl --insecure create worker initiate-payment --handler cat
Mac
./bin/zbctl.darwin --insecure create worker initiate-payment --handler cat
Windows
./bin/zbctl.exe --insecure create worker initiate-payment --handler "findstr .*"
You should see a response along the lines of:
Activated job 12 with payload {"orderId":"2345","orderValue":100}
Activated job 7 with payload {"orderId":"1234","orderValue":99}
Handler completed job 12 with payload {"orderId":"2345","orderValue":100}
Handler completed job 7 with payload {"orderId":"1234","orderValue":99}
We can see that the job worker activated then completed the two available initiate-payment jobs. You can shut down the job worker if you'd like--you won't need it in the rest of the tutorial.
Now go to the browser tab where you're running Operate. You should see that the workflow instances have advanced to the intermediate message catch event and are waiting there.
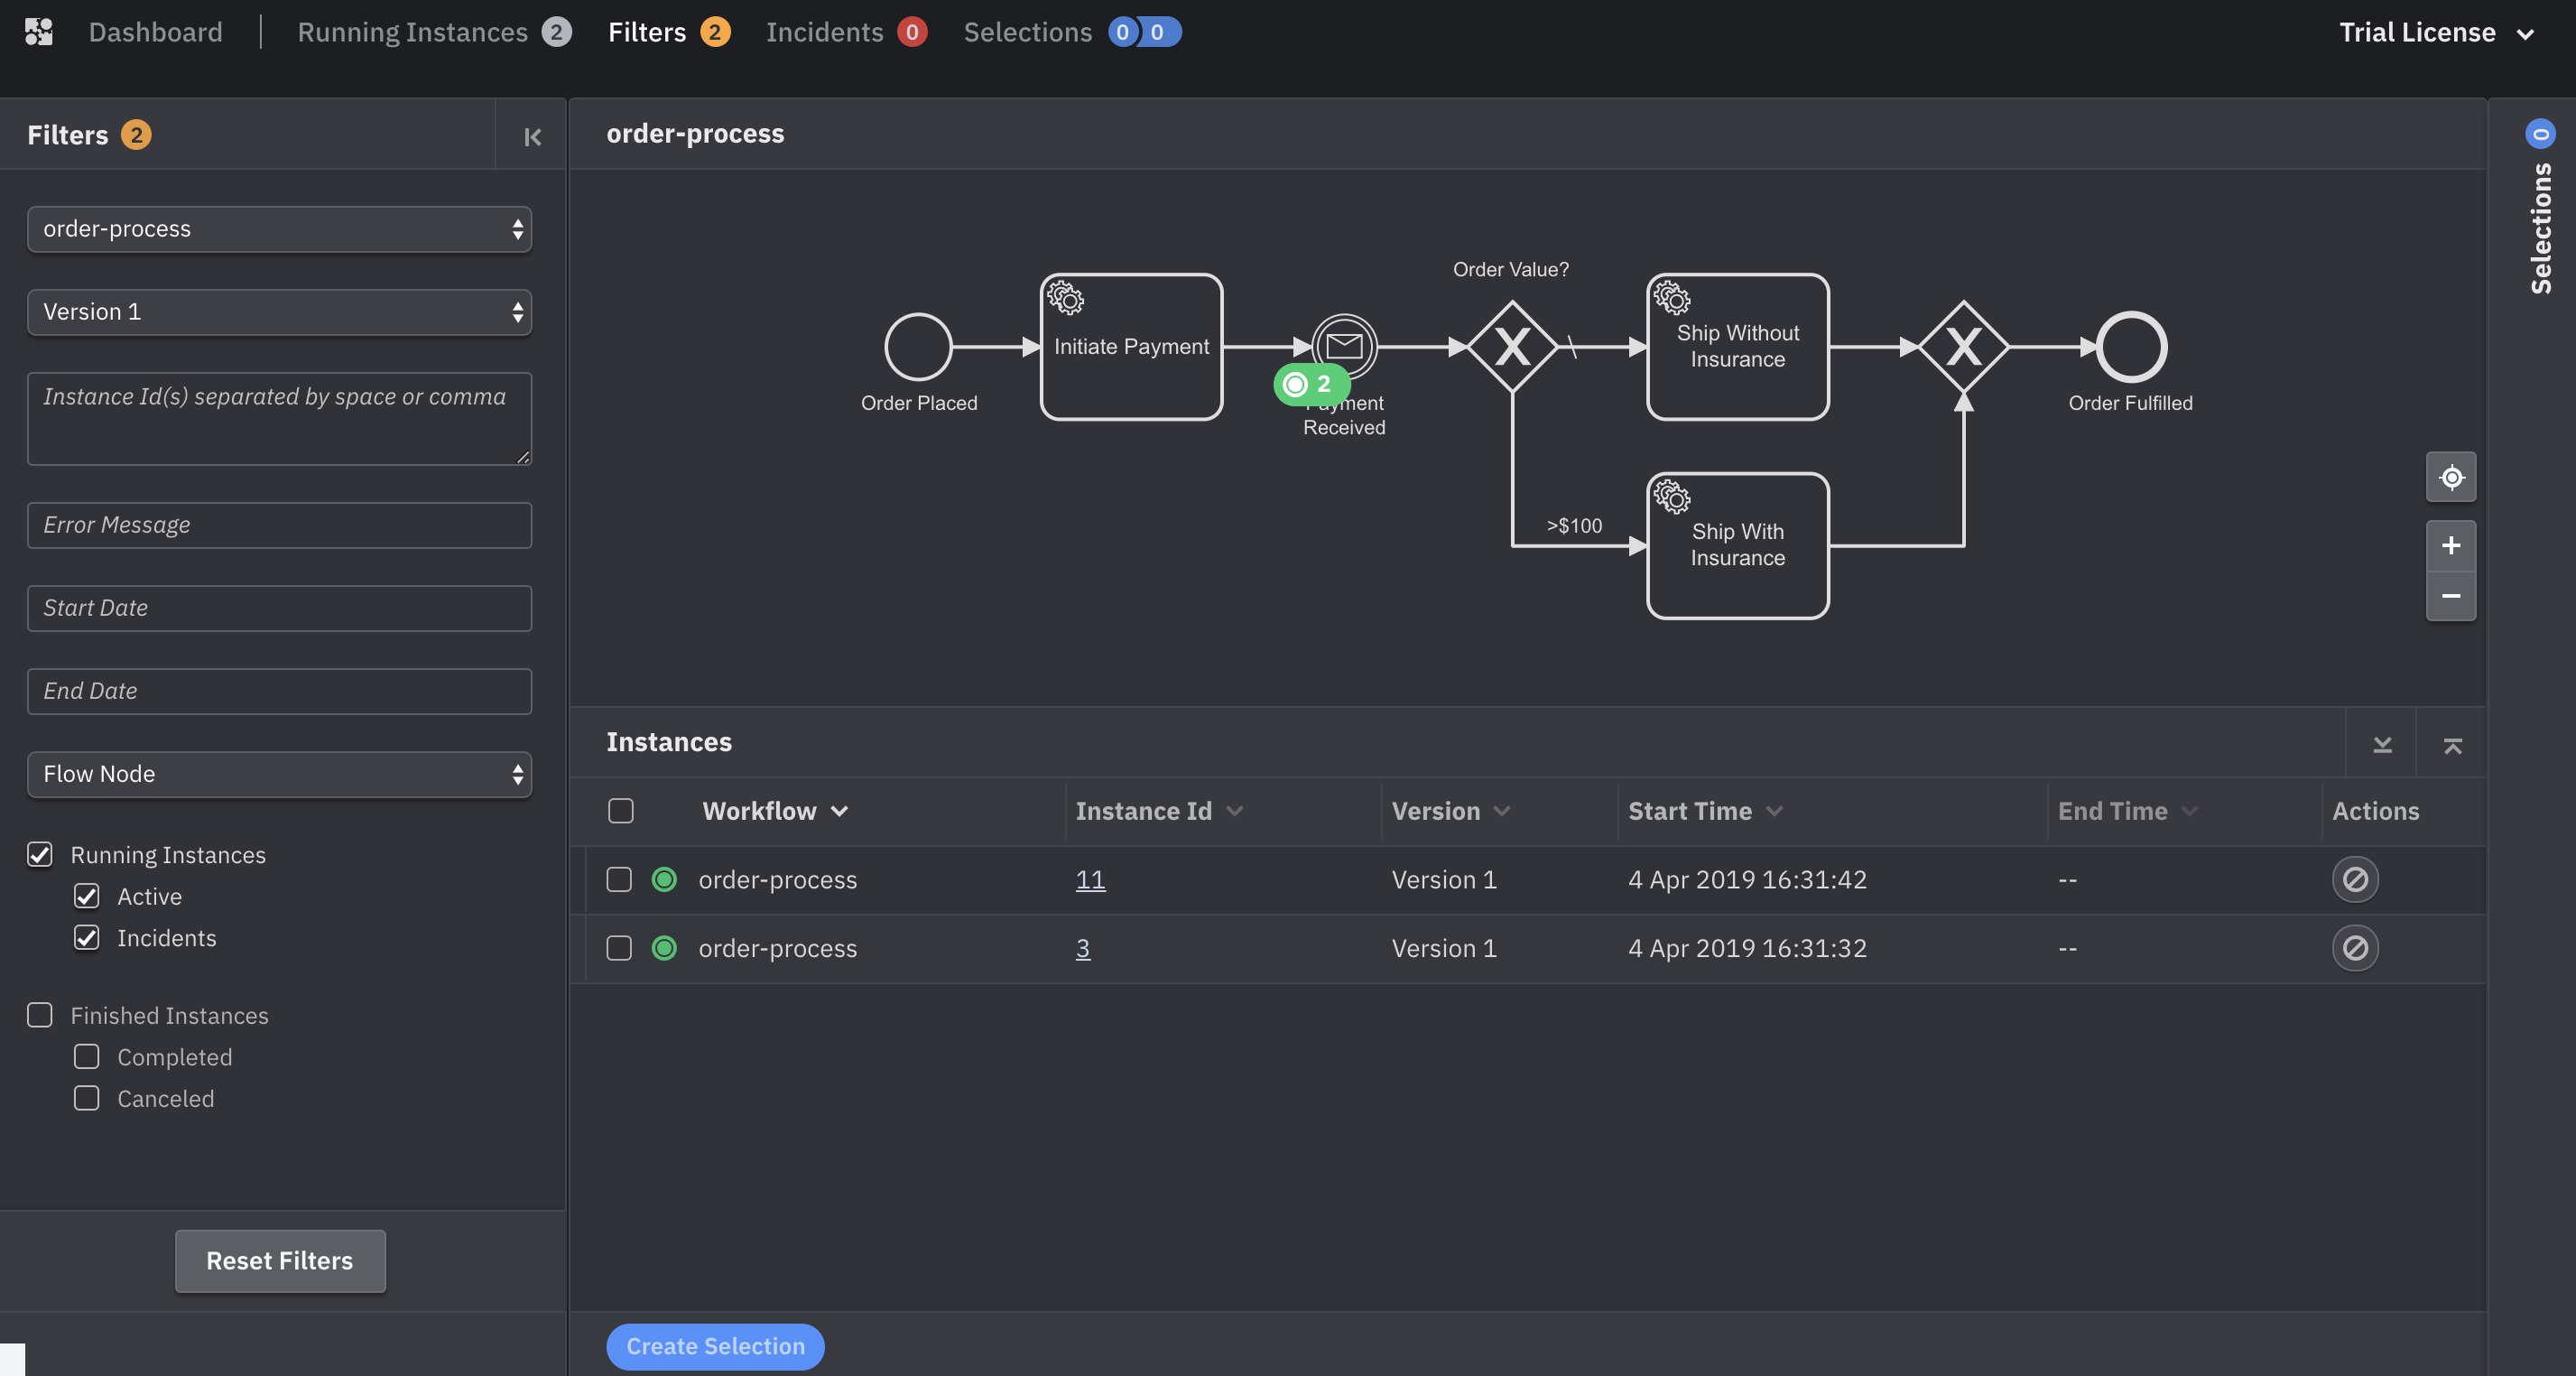
The workflow instances will wait at the intermediate message catch event until a message is received by Zeebe and correlated to the instances. Messages can be published using Zeebe clients, and it's also possible for Zeebe to connect to a message queue such as Apache Kafka and correlate messages published there to workflow instances.
zbctl also supports message publishing, so we'll continue to use it in our demo. Below is the command we'll use to publish and correlate a message. You'll see that we provide the message "Name" that we assigned to this message event in the Zeebe Modeler as well as the orderId that we included in the payload of the instance when we created it.
Remember, orderId is the correlation key we set in the Modeler when configuring the message event. Zeebe requires both of these fields to be able to correlate a message to a workflow instance. Because we have two workflow instances with two distinct orderId, we'll need to publish two messages. Run these two commands one after the other:
Linux
./bin/zbctl --insecure publish message "payment-received" --correlationKey="1234"
./bin/zbctl --insecure publish message "payment-received" --correlationKey="2345"
Mac
./bin/zbctl.darwin --insecure publish message "payment-received" --correlationKey="1234"
./bin/zbctl.darwin --insecure publish message "payment-received" --correlationKey="2345"
Windows
./bin/zbctl.exe --insecure publish message "payment-received" --correlationKey="1234"
./bin/zbctl.exe --insecure publish message "payment-received" --correlationKey="2345"
You won't see a response in your Terminal window, but if you refresh Operate, you should see that the messages were correlated successfully and that one workflow instance has advanced to the Ship With Insurance task and the other has advanced to the Ship Without Insurance task.
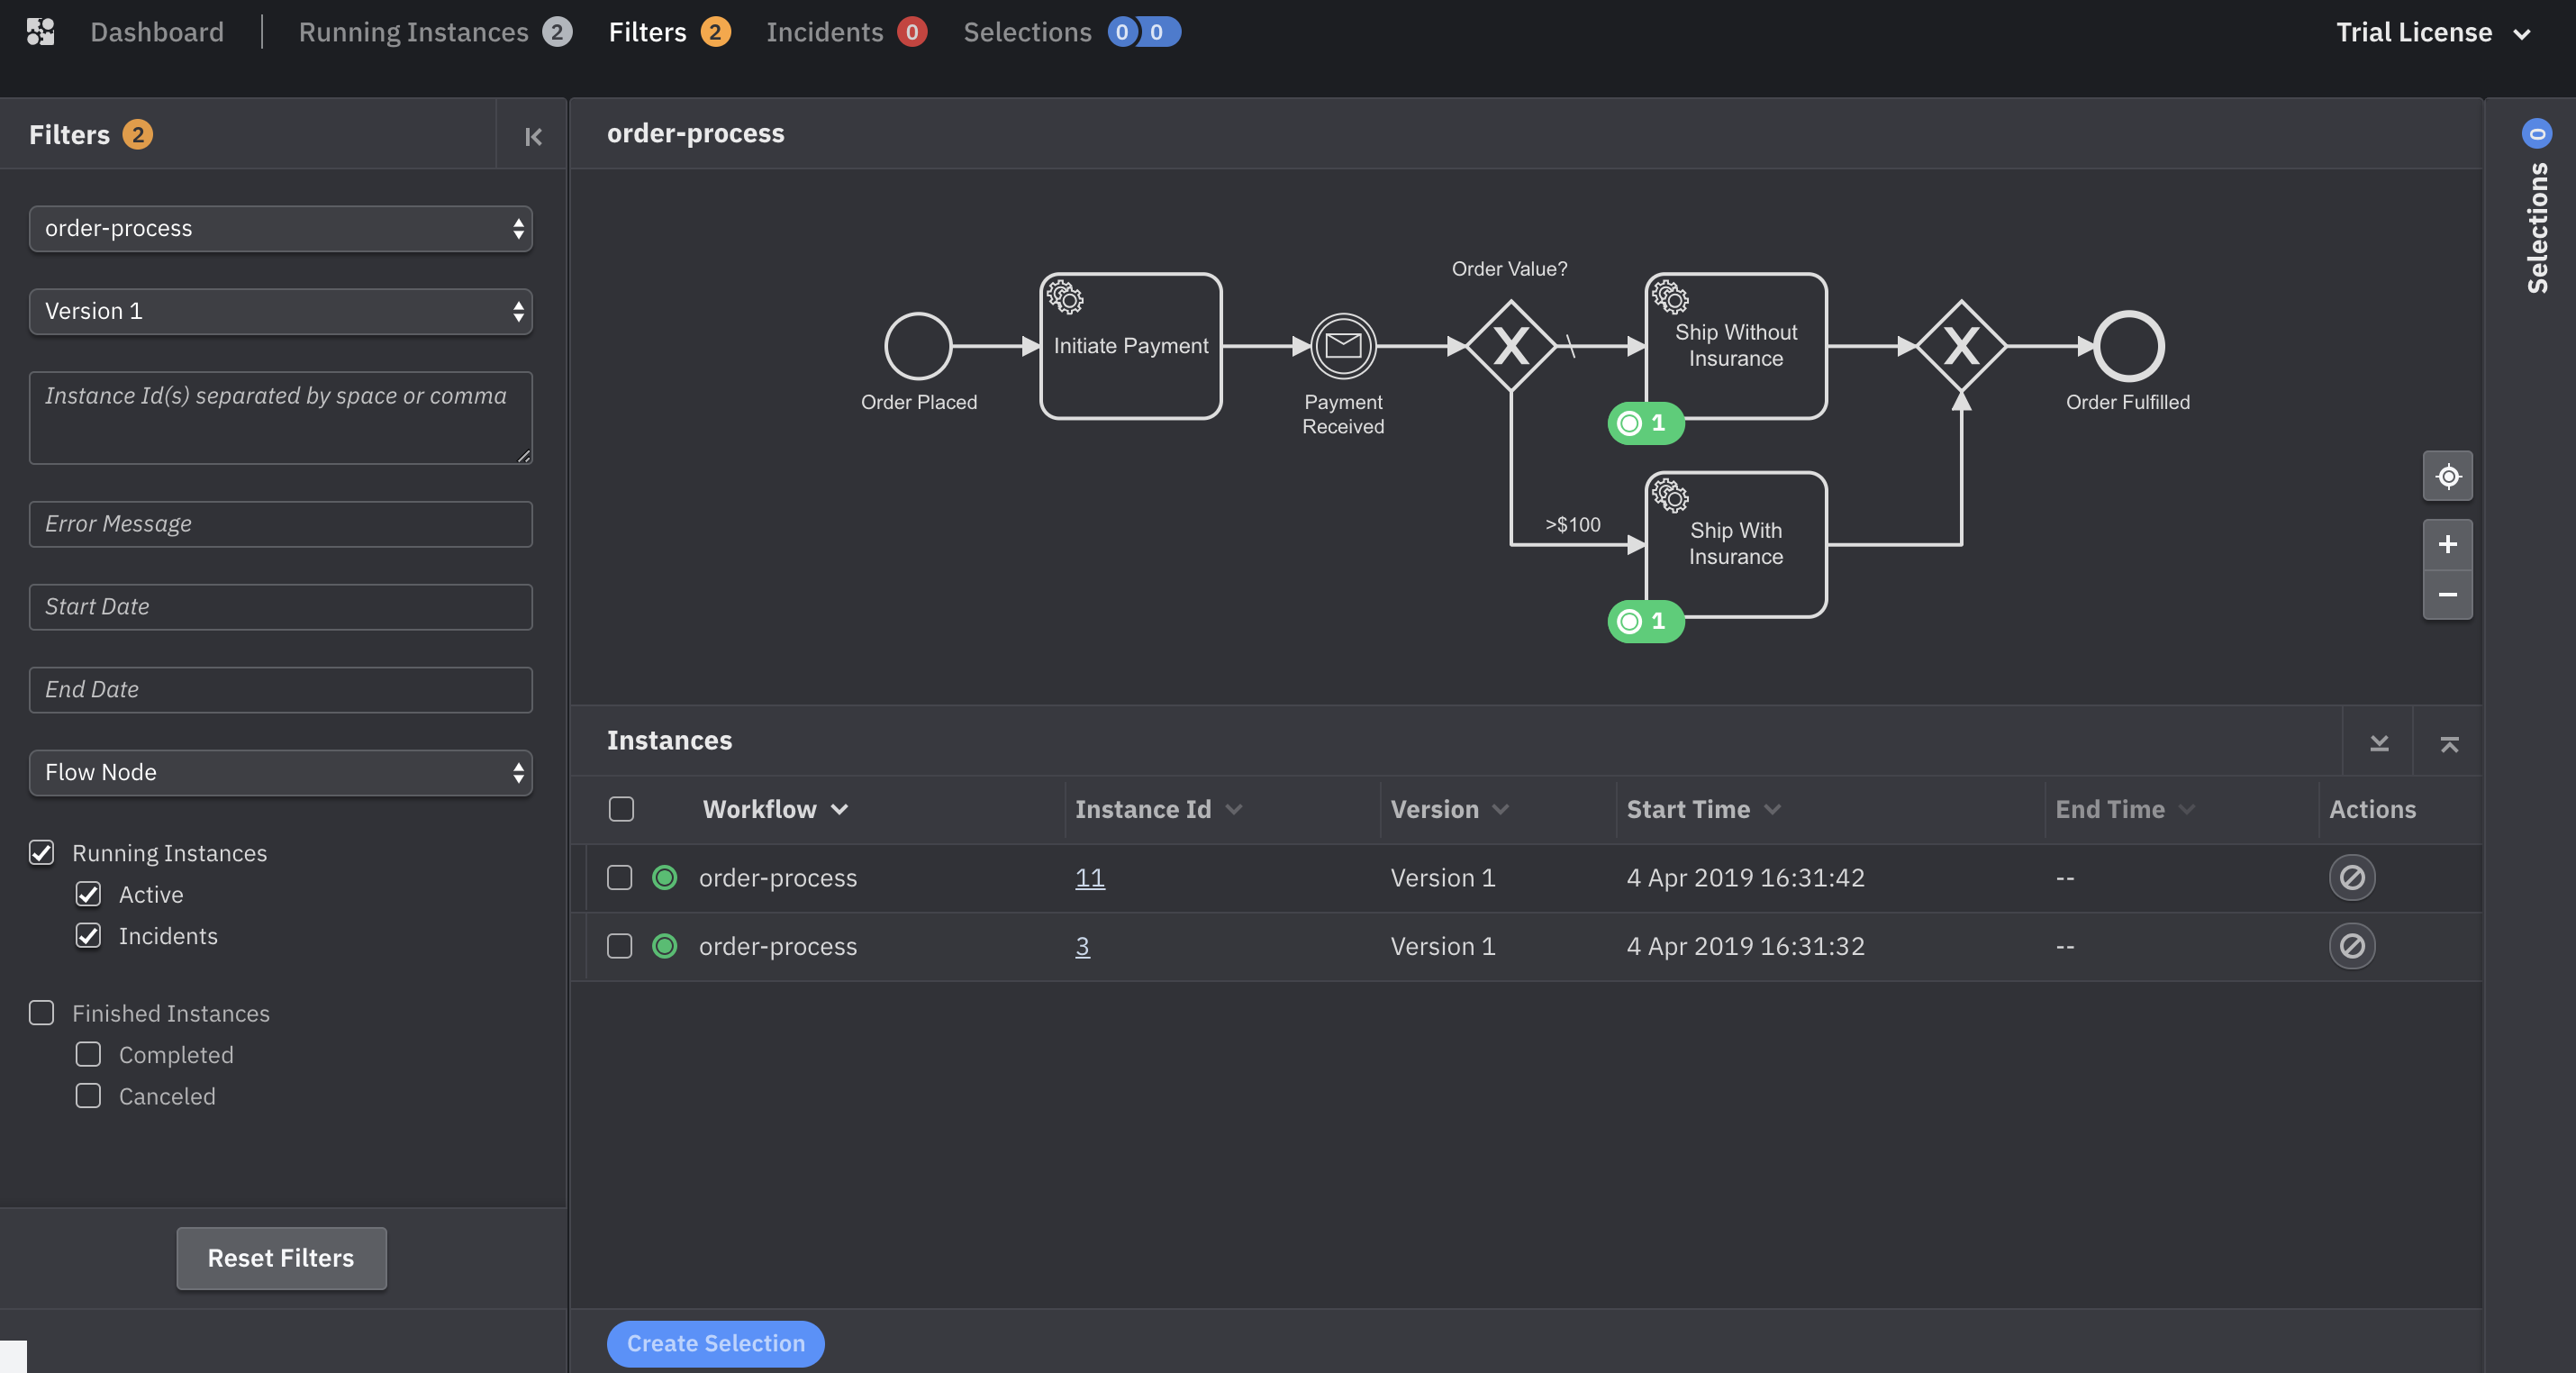
The good news is that this visualization confirms that our decision logic worked as expected: our workflow instance with an orderValue of $100 will ship with insurance, and our workflow instance with an orderValue of $99 will ship without insurance.
You probably know what you need to do next. Go ahead and open a Terminal window and create a job worker for the ship-without-insurance job type.
Linux
./bin/zbctl --insecure create worker ship-without-insurance --handler cat
Mac
./bin/zbctl.darwin --insecure create worker ship-without-insurance --handler cat
Windows
./bin/zbctl.exe --insecure create worker ship-without-insurance --handler "findstr .*"
You should see a response along the lines of:
Activated job 529 with payload {"orderId":"1234","orderValue":99}
Handler completed job 529 with payload {"orderId":"1234","orderValue":99}
You can shut down this worker now.
Select the Finished Instances checkbox in the bottom left of Operate, refresh the page, and voila! You'll see your first completed Zeebe workflow instance.
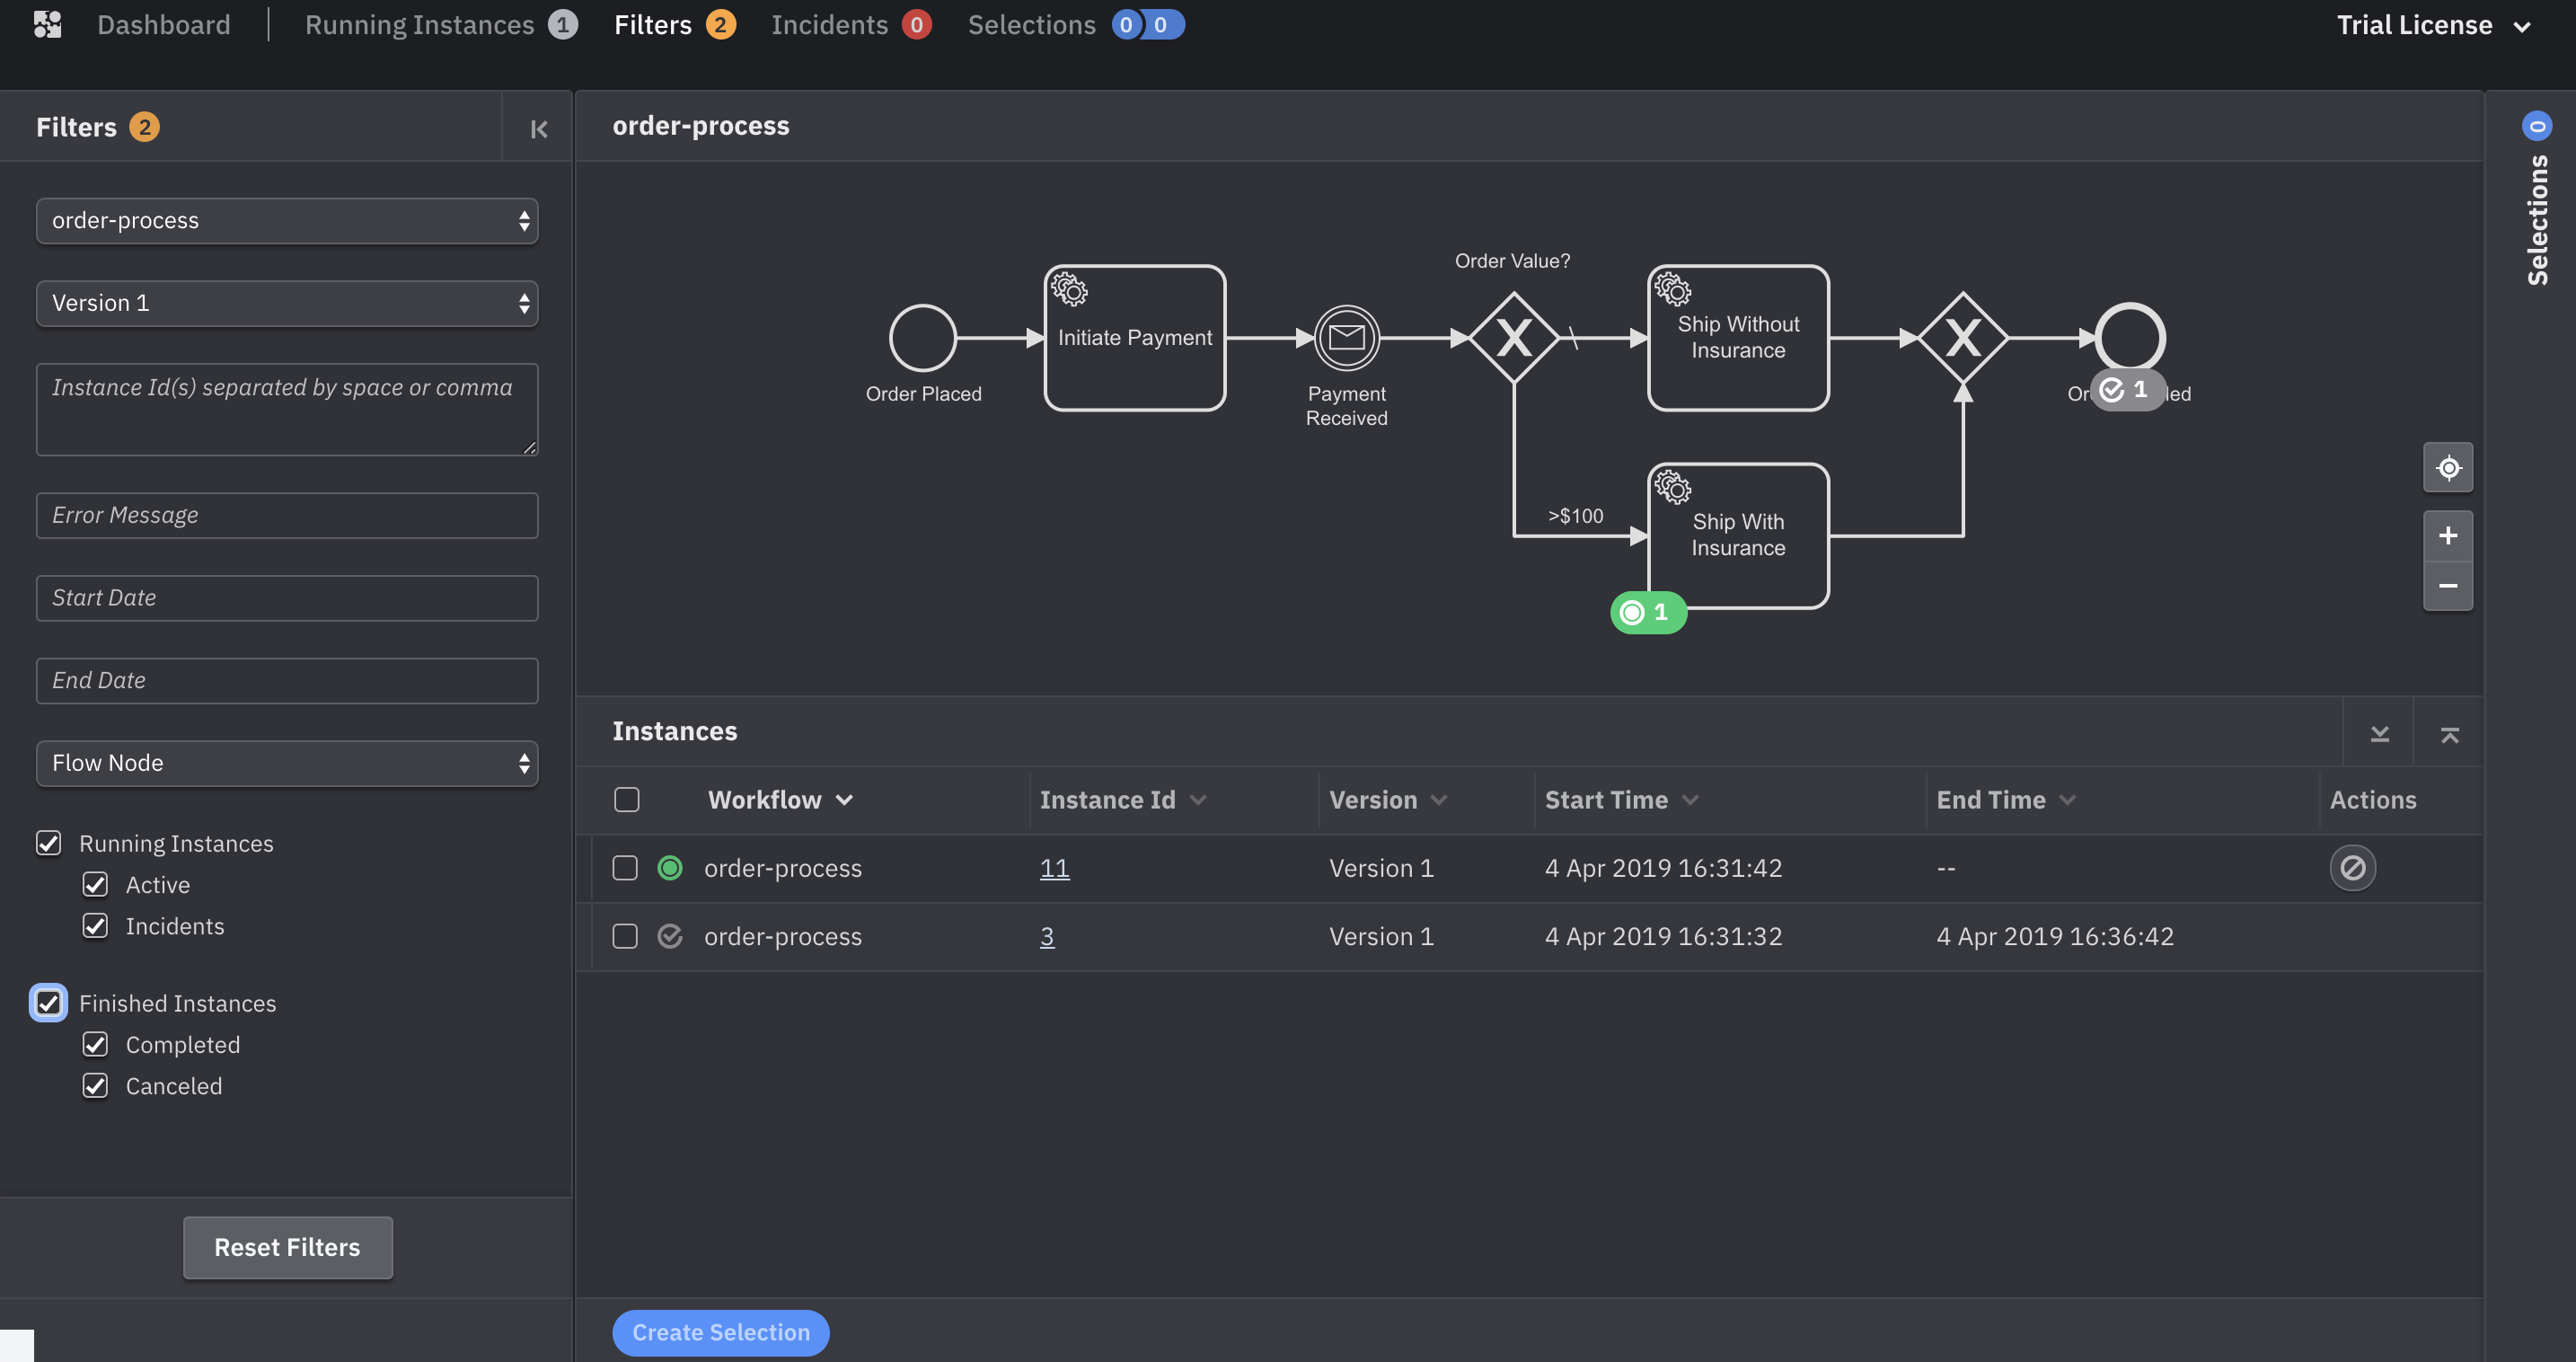
Because the Ship With Insurance task has a different job type, we need to create a second worker that can take on this job.
Linux
./bin/zbctl --insecure create worker ship-with-insurance --handler cat
Mac
./bin/zbctl.darwin --insecure create worker ship-with-insurance --handler cat
Windows
./bin/zbctl.exe --insecure create worker ship-with-insurance --handler "findstr .*"
You should see a response along the lines of:
Activated job 535 with payload {"orderId":"2345","orderValue":100}
Handler completed job 535 with payload {"orderId":"2345","orderValue":100}
You can shut down this worker, too.
Let's take one more look in Operate to confirm that both workflow instances have been completed.
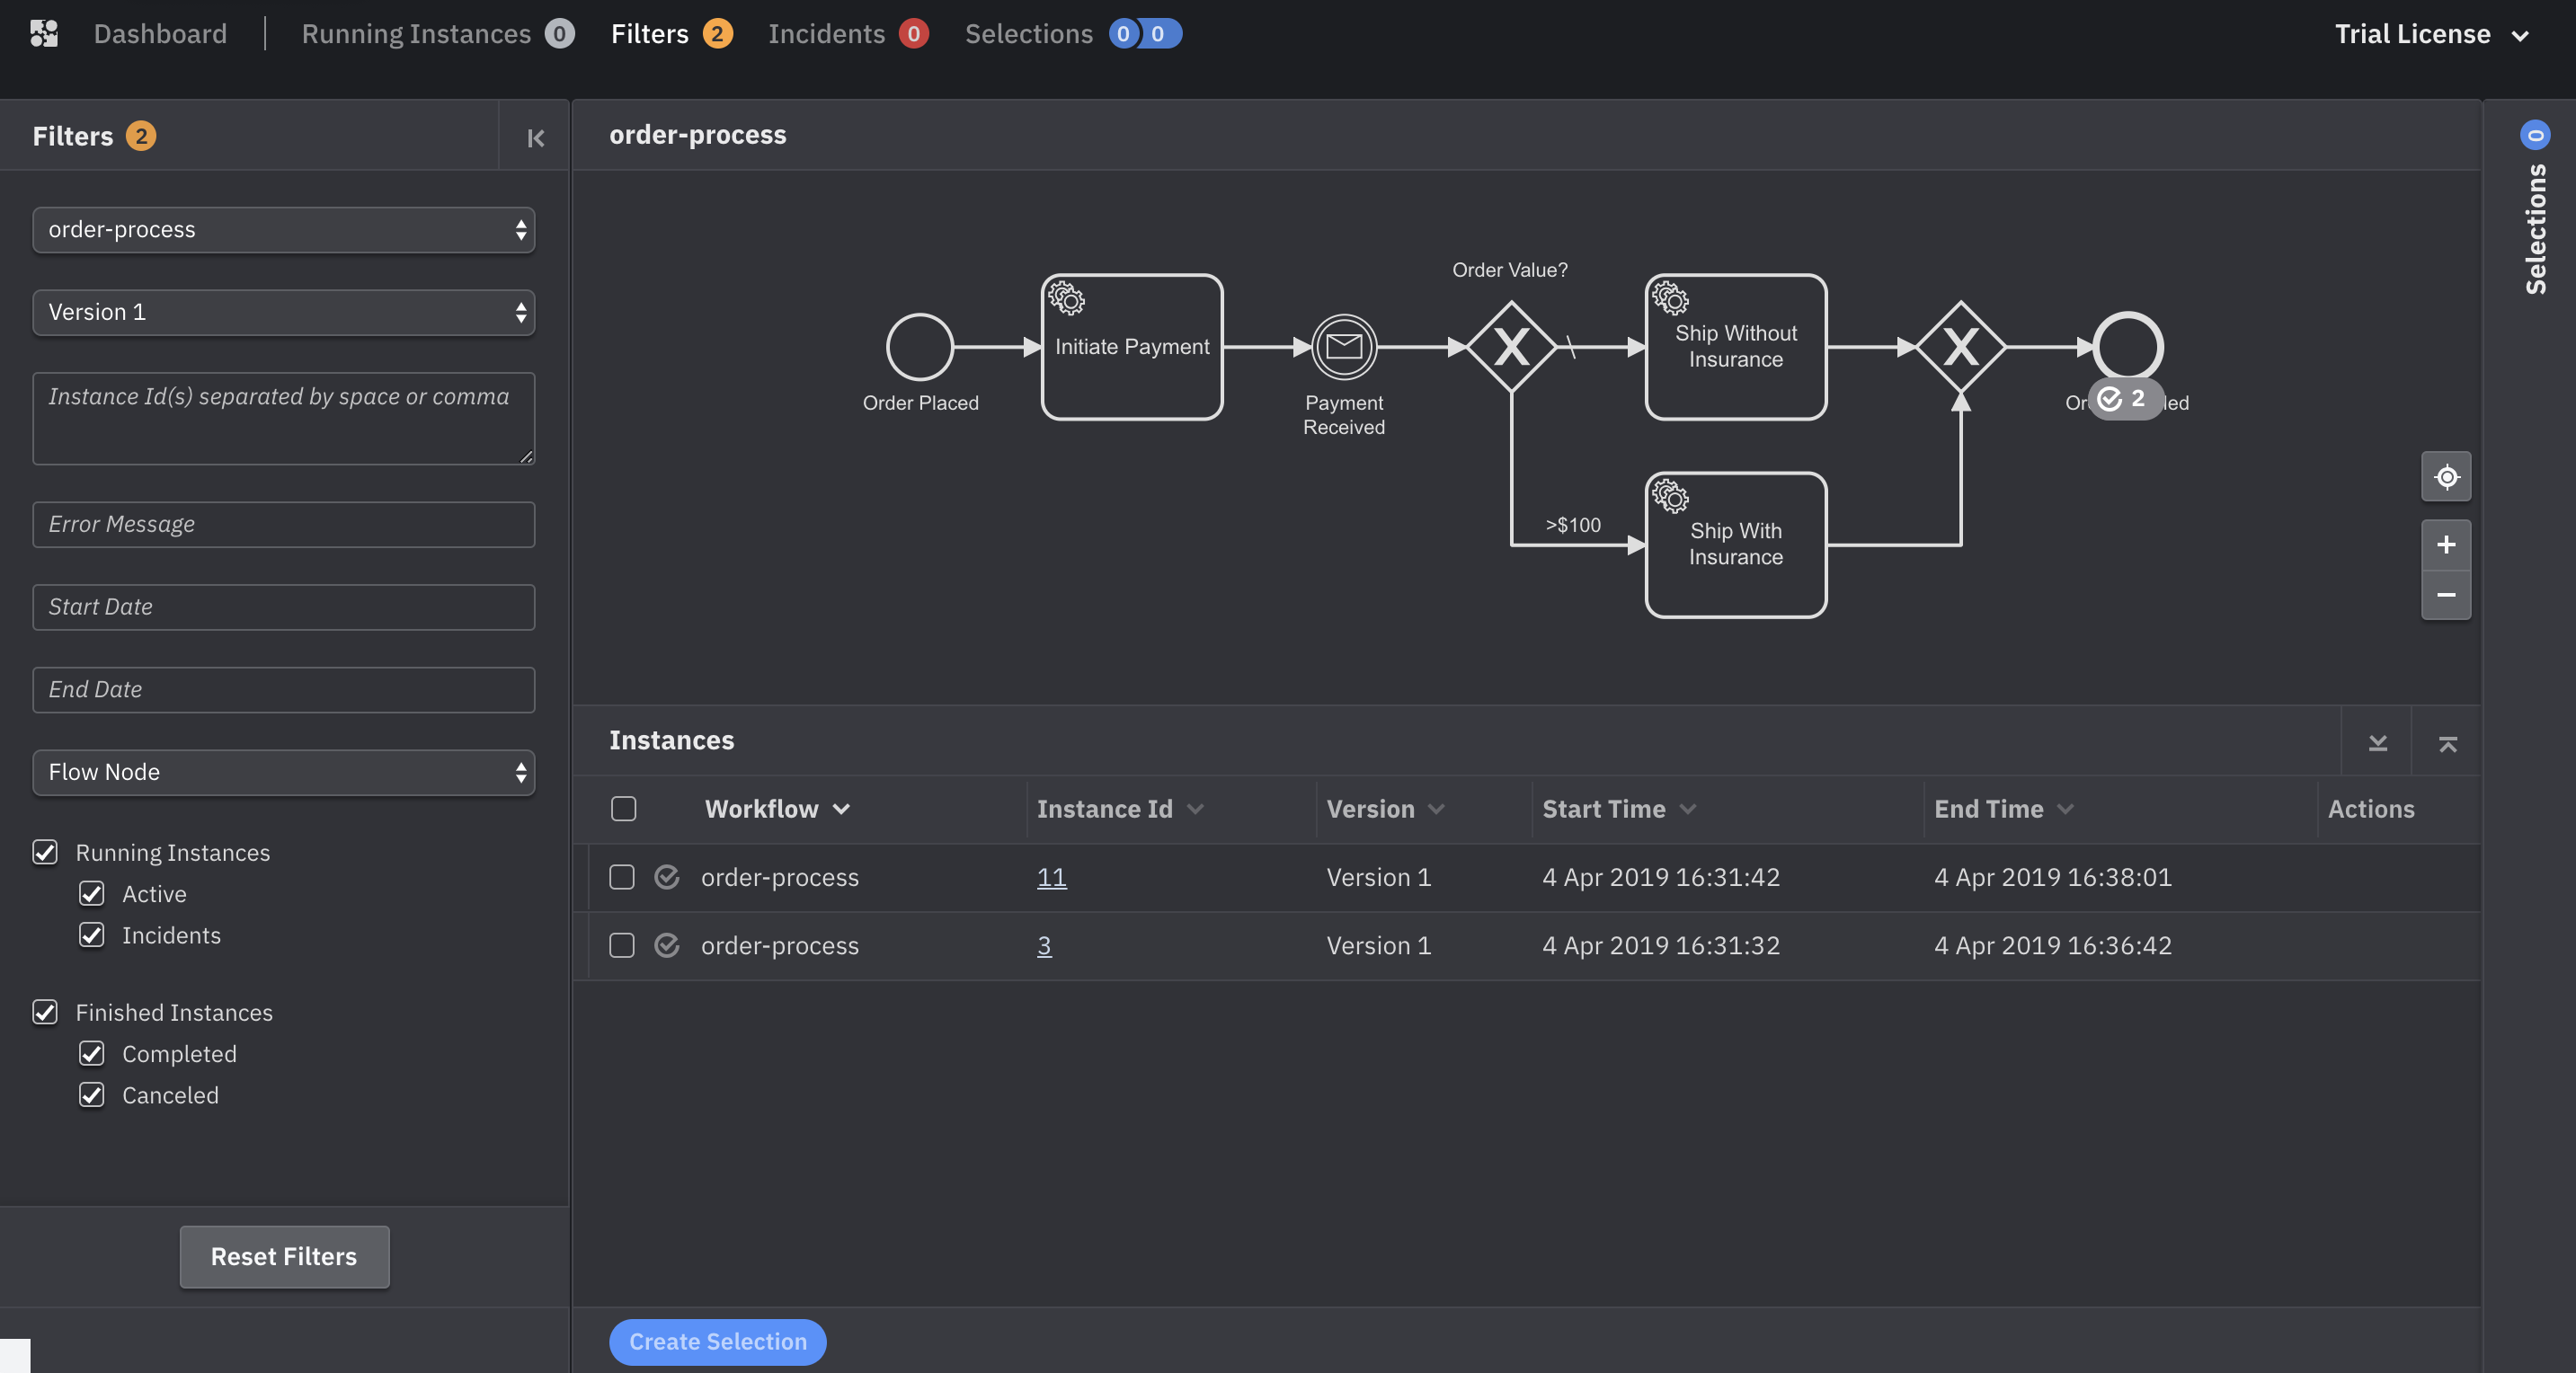
Hooray! You've completed the tutorial! Congratulations.
In the next and final section, we'll point you to resources we think you'll find helpful as you continue working with Zeebe.